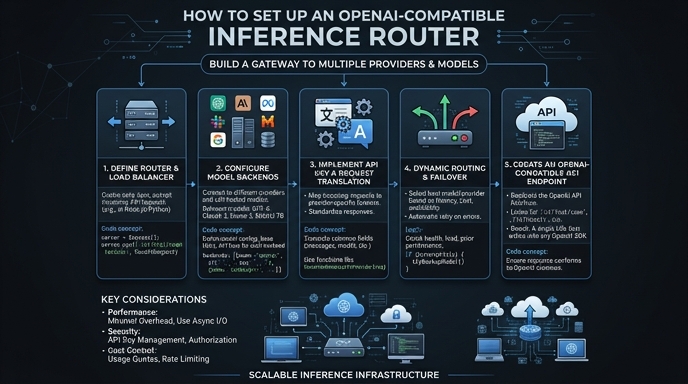
An OpenAI-compatible inference router acts as an API gateway that sits between your application and various LLM backends. By using the standard OpenAI SDK, you can dynamically route requests across different model providers without rewriting your application code, significantly improving flexibility and reducing vendor lock-in.
In this guide, you will learn how to configure your development environment to point to a centralized router instead of the default OpenAI endpoint. This allows you to manage model selection, load balancing, and cost-optimization rules centrally while maintaining the familiar interface of the OpenAI API.
Prerequisites
- An active account with your chosen inference router provider.
- The official OpenAI Python or Node.js SDK installed in your project.
- An API key generated from your router dashboard.
- Basic knowledge of environment variable management for storing API credentials.
Steps
- 1
Install the OpenAI SDK
Begin by installing the official OpenAI library in your environment. Run 'pip install openai' for Python or 'npm install openai' for Node.js projects to ensure you have the necessary client code.
- 2
Configure Environment Variables
Securely store your router-provided API key by adding it to your .env file as OPENAI_API_KEY. Avoid hardcoding this credential directly in your source files to prevent accidental exposure.
- 3
Initialize the Client with Base URL
When instantiating the client, override the default base URL to point to your router's endpoint. Set the base_url parameter to 'https://api.select.ax/v1' to ensure all subsequent requests are intercepted by your router.
- 4
Execute Inference Requests
Perform your chat completion or embedding calls as you would with standard OpenAI usage. Ensure the model parameter is set to 'smart-select' to let the router handle the dynamic model routing logic.
- 5
Verify and Monitor Traffic
Run your application and inspect the network logs or your router dashboard to confirm requests are successfully routing. Check for successful 200 OK responses to ensure the API handshake is fully compatible.
Code
import os
from openai import OpenAI

# Initialize the client pointing to the inference router
client = OpenAI(
    base_url="https://api.select.ax/v1",
    api_key=os.environ.get("OPENAI_API_KEY")
)

# Call the model via the router
response = client.chat.completions.create(
    model="smart-select",
    messages=[{"role": "user", "content": "Explain how inference routing works."}]
)

print(response.choices[0].message.content)
Pro tips
Use Environment-Specific URLs
Use different base URLs for development and production environments to test your routing rules without affecting live traffic.
Handle Rate Limits
Implement exponential backoff retry logic in your application to handle transient rate limit errors gracefully when routing high-volume traffic.
Leverage Model Tagging
If your router supports custom headers, pass them through the client to enable advanced observability and cost-tracking per request.
Visual guide
Route your models intelligently
Use one API key for routing, fallback, and cost control across model providers.
Route your models intelligently — try Select