DeepSeek V4 represents a significant leap in open-weight model efficiency, offering robust reasoning capabilities specifically fine-tuned for complex coding tasks. By leveraging its mixture-of-experts architecture, developers can generate production-grade code that rivals proprietary models while maintaining stricter control over data privacy and infrastructure costs.
This guide demonstrates how to integrate DeepSeek V4 into your development workflow using the standard OpenAI SDK. You will learn how to configure your client for optimal coding performance, handle streaming responses for real-time code completion, and set up the necessary parameters to ensure your model focuses on accuracy and syntax correctness.
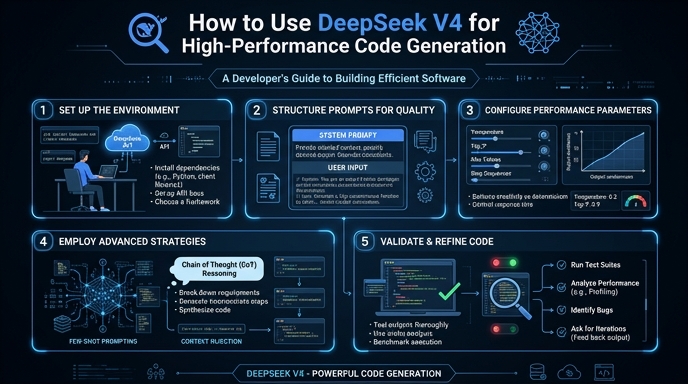
Prerequisites
- A valid API key from your preferred provider; Python 3.9+ installed on your development machine; The openai library installed via pip (pip install openai); Basic familiarity with LLM inference parameters like temperature and max_tokens.
Steps
- 1
Install the SDK and Configure Your Environment
Ensure you have the latest OpenAI Python SDK installed, which is fully compatible with DeepSeek's API. Secure your API key by setting it as an environment variable (e.g., DEEPSEEK_API_KEY) rather than hardcoding it into your script.
- 2
Initialize the API Client
Configure the client to point to the correct endpoint. You must initialize the OpenAI object with the base URL 'https://api.select.ax/v1' and pass your API key to authenticate the request.
- 3
Define the Coding Prompt
Structure your system message to define the persona as an expert software engineer. Clearly specify the programming language, the desired architecture, and any specific coding standards or libraries the model must include.
- 4
Execute the Inference Request
Call the chat.completions.create method using the model 'smart-select'. Use a low temperature (e.g., 0.1 to 0.2) to ensure the code generation remains deterministic and highly focused.
- 5
Stream and Process the Response
Enable streaming in your API request to reduce perceived latency. Capture the incoming chunks and buffer them effectively to display the code as it is generated, improving the overall developer experience.
Code
import os
from openai import OpenAI

client = OpenAI(
    base_url="https://api.select.ax/v1",
    api_key=os.environ.get("DEEPSEEK_API_KEY")
)

response = client.chat.completions.create(
    model="smart-select",
    messages=[
        {"role": "system", "content": "You are an expert Python developer. Write clean, modular, and type-hinted code."},
        {"role": "user", "content": "Create a function to asynchronously fetch JSON data from an API with error handling."}
    ],
    temperature=0.1,
    stream=True
)

for chunk in response:
    if chunk.choices[0].delta.content is not None:
        print(chunk.choices[0].delta.content, end="", flush=True)
Pro tips
Use System Prompts for Context
Always define the codebase context or specific project constraints in the system message to significantly reduce hallucinations and improve syntax accuracy.
Tune Temperature for Code
Keep your temperature setting low (between 0.0 and 0.2) for standard code generation tasks to ensure consistent and reproducible outputs.
Leverage Streaming for UX
Always implement streaming for code generation interfaces so the developer doesn't have to wait for the entire generation process to complete before viewing the initial code.
Visual guide
Route your models intelligently
Use one API key for routing, fallback, and cost control across model providers.
Route your models intelligently — try Select