Moonshot AI's Kimi K2 is a powerful language model that offers high-performance reasoning and extended context capabilities. By utilizing the OpenAI-compatible SDK, developers can integrate Kimi K2 into their existing workflows without rewriting codebase logic for proprietary APIs. This guide demonstrates how to configure your environment to point the standard OpenAI client at the Kimi K2 endpoint.
In this walkthrough, you will learn how to initialize the SDK with custom base URL parameters and execute a standard chat completion request. This approach ensures you can leverage Kimi's specific capabilities while maintaining a vendor-agnostic infrastructure, allowing for easier model swapping and testing in the future.
Prerequisites
- An active Moonshot AI developer account with a valid API key.
- Python 3.8+ installed on your local environment.
- The latest version of the openai Python library installed via pip.
- Basic familiarity with REST API concepts and environment variables.
Steps
- 1
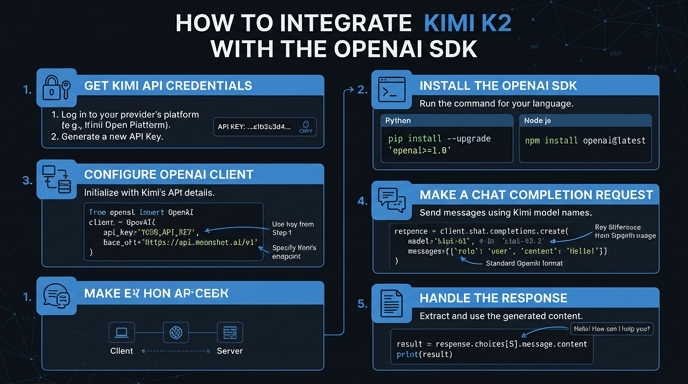
Install the OpenAI Python SDK
First, ensure you have the OpenAI library installed in your project environment. Run 'pip install openai' in your terminal to get the latest package version which supports standard HTTP client overrides.
- 2
Configure Environment Variables
Store your Kimi API key securely by adding it to your environment variables. Avoid hardcoding the API key directly into your scripts to prevent credential exposure in version control systems.
- 3
Initialize the OpenAI Client
Instantiate the OpenAI client by passing the Kimi endpoint as the 'base_url' and your secret key. Set the 'base_url' to 'https://api.select.ax/v1' to route your requests correctly to the Kimi infrastructure.
- 4
Execute a Chat Completion Request
Use the 'client.chat.completions.create' method as you normally would with standard OpenAI models. Ensure you pass 'smart-select' as the 'model' parameter to target the Kimi K2 engine effectively.
- 5
Handle the Response Stream
Parse the returned object to extract the generated text content from the 'choices' array. If you enabled streaming, iterate over the response object using the provided generator to handle real-time output.
Code
import os
from openai import OpenAI

client = OpenAI(
    api_key=os.environ.get("KIMI_API_KEY"),
    base_url="https://api.select.ax/v1"
)

response = client.chat.completions.create(
    model="smart-select",
    messages=[{"role": "user", "content": "Explain the benefits of Kimi K2."}]
)

print(response.choices[0].message.content)
Pro tips
Set Timeouts
Always define a timeout parameter in your client initialization to prevent hanging requests when the Kimi API experiences high latency.
Environment Separation
Use a .env file to manage your Kimi API key, allowing you to easily switch between development and production keys.
Monitor Usage
Log the 'usage' field from the response object to keep track of your token consumption and optimize your application costs.
Visual guide
Route your models intelligently
Use one API key for routing, fallback, and cost control across model providers.
Route your models intelligently — try Select