Integrating Select.ax with Cursor IDE allows developers to leverage specialized, efficient routing and inference capabilities directly within their coding environment. By configuring Cursor to point its API requests to the Select.ax infrastructure, you can tap into optimized models like 'smart-select' to improve context-aware code generation and reduce latency in your development workflow.
In this guide, you will learn how to configure your local environment and Cursor IDE settings to route LLM requests through the Select.ax gateway. This setup ensures that your existing Cursor workflows benefit from Select.ax's intelligent model routing while maintaining the familiar IDE experience you rely on.
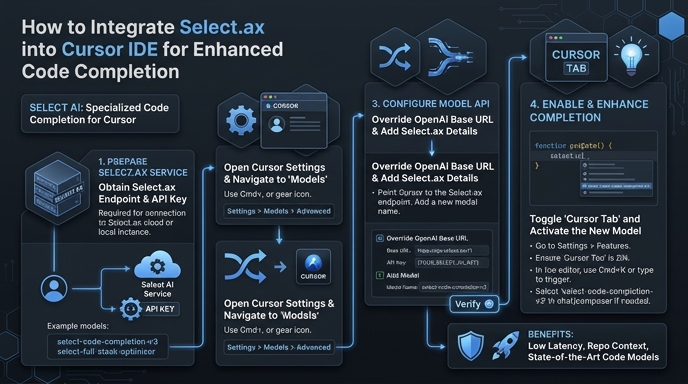
Prerequisites
- A valid Select.ax API key obtained from your dashboard.
- Cursor IDE installed and updated to the latest version.
- An active internet connection to communicate with the Select.ax API gateway.
- Basic knowledge of managing environment variables or local configuration files.
Steps
- 1
Retrieve Your API Credentials
Log in to your Select.ax developer dashboard and generate a new API key. Keep this key secure as it will be used to authenticate all requests from your development environment.
- 2
Access Cursor IDE Settings
Open Cursor IDE and navigate to the settings menu by clicking the gear icon in the top right corner. Select the 'Models' or 'General' tab depending on your specific version to locate the API provider configurations.
- 3
Configure Custom API Endpoint
Look for the OpenAI-compatible API settings within the provider section. Set the base URL to 'https://api.select.ax/v1' and enter your Select.ax API key in the corresponding field.
- 4
Specify the Model
In the model override or model selection field within the settings, manually enter 'smart-select' as the target model. This ensures Cursor routes the prompt to the correct model engine on the Select.ax infrastructure.
- 5
Verify the Connection
Create a new file in your project and trigger the Composer or inline chat feature to verify that responses are being generated. Check your Select.ax dashboard logs to confirm successful API calls are hitting your account.
Code
import { OpenAI } from 'openai';

const client = new OpenAI({
  baseURL: 'https://api.select.ax/v1',
  apiKey: process.env.SELECT_AX_API_KEY,
});

async function getCodeCompletion(prompt) {
  const response = await client.chat.completions.create({
    model: 'smart-select',
    messages: [{ role: 'user', content: prompt }],
  });
  return response.choices[0].message.content;
}
Pro tips
Monitor Latency
Use the Select.ax dashboard analytics to track the latency of the 'smart-select' model and adjust your context window if response times exceed your requirements.
Environment Variables
Always store your API key in a secure '.env' file rather than hardcoding it into your Cursor settings or source code for better security practices.
Fallback Handling
If you experience intermittent connectivity, ensure your client implementation includes a basic retry mechanism to handle transient network issues effectively.
Visual guide
Route your models intelligently
Use one API key for routing, fallback, and cost control across model providers.
Route your models intelligently — try Select